


Every few days, a gorgeous palette knife painted cake pops up in my Instagram explore feed. So, I figured it was high time to try this artistic method for myself!
If you’re unfamiliar, the technique is named after the blunt, flat artist’s tool, usually used to mix oil paints together. Then, the artist uses the palette knife to ~smoosh~ the paint, very artfully and abstractly, onto the canvas. And, yes – “smoosh” is expert terminology. In our case, the canvas is edible, ready for adornment with beautiful shades of buttercream “paint.”

Plus, I’ll share with you my new recipe: Salted Caramel Hot Chocolate Cake. This spin on my popular peppermint hot chocolate cake replaces the crunchy peppermint candy layer with smooth, salted caramel buttercream and a crunchy honey nut layer. It’s super delicious and the perfect complement to a steaming beveragino.
To begin, check out my time-lapse tutorial video! Then, peruse the materials list, written recipe, and instructions. Most importantly, don’t forget to have fun!
How To Paint A Cake With A Palette Knife
First, check out my time-lapse video tutorial to gain a visual grasp of the palette knife cake painting method!
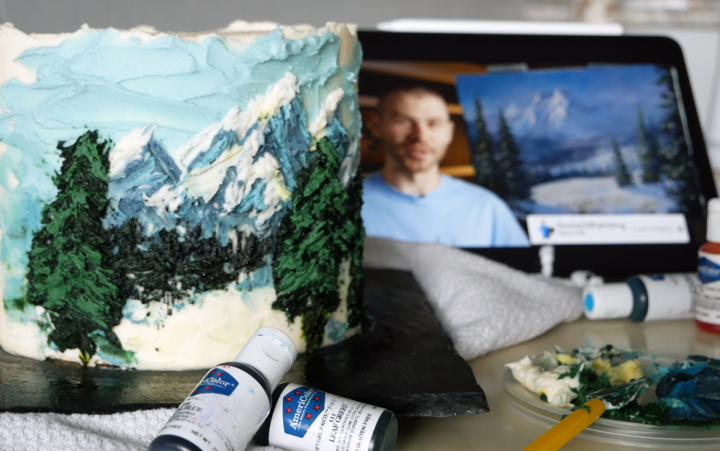
The image featured on my cake was inspired by Kevin Hill’s beautiful “Winter Mountain Range” oil painting. If you don’t consider yourself very artistic or haven’t had a lot of practice with traditional painting, I recommend watching his oil painting tutorial video to better understand the creative process, before starting to interpret it onto the cake.
Materials You’ll Need For A Palette Knife Painted Cake
Next, to decorate and paint your cake, you’ll need to gather some special items. First, peruse the list below and gather all of your tools! I’ve included links for easy shopping. I’m an Amazon affiliate, so our site may make a small commission on applicable sales, at no additional cost to the consumer.
Basic Kitchen Items:
- Medium-sized mixing bowl
- Sifter
- Stand or handheld mixer
- Pour spout measuring cup
- Spatula and whisk
- Toothpicks
- Cooling rack
- Saucepan
- Chef’s knife
- Cutting board
Specialty Baking Equipment:
- 3, 6-inch cake pans
- Cake decorating kit with a turntable, offset spatula, piping bag, and a bench scraper
- Wire cake leveler
- Food coloring gels
- Tapered offset spatula/palette knives – or, if you have a fondant decorating set like this one, you can use the triangular fondant tool
Palette Knife Painted Salted Caramel Hot Chocolate Cake Recipe & Method
Before you start baking, it’s always a good idea to read through the recipe once fully. Then, go ahead and bake! Feel free to print out this recipe, or save it to Pinterest using one of the “pins” below!

Salted Caramel Hot Chocolate Cake
Ingredients
Hot Chocolate Cake
- 1½ cups all-purpose flour
- ¾ cup cocoa powder (plus more for prep)
- 2 tsp baking powder
- ½ tsp baking soda
- ½ tsp salt
- ¾ cup finely chopped bittersweet chocolate
- ¾ cup room temp butter (1 ½ sticks, plus more for prep)
- 2 cups granulated sugar (I like golden sugar, but you can use white if it's all you have - just don't use brown unless you're really in a pinch)
- 2 large eggs, room temperature
- 1 tsp vanilla extract
- 1 cup hot cocoa made with milk
- 1 cup brewed coffee
Salted Caramel Buttercream
- 1½ cups room temperature butter (3 sticks)
- 6 cups powdered sugar
- 2 tsp vanilla extract
- 2-4 tsp heavy cream
Homemade Caramel
- ½ cup granulated sugar
- ¼ cup warm heavy cream
- 1 tbsp room temp butter
- 2 tsp vanilla extract
- 1-2 tsp sea salt (to taste)
- ⅛ cup water
Honey Roasted Nuts
- 1 cup honey roasted nuts, chopped (to preference)
Instructions
Hot Chocolate Cake
- Butter your cake pans and coat them thoroughly with some extra cocoa powder. Then, preheat the oven to 350°F.
- Next, in a medium-sized mixing bowl, sift together the flour, cocoa powder, baking powder, baking soda, salt, and chopped chocolate. Set aside.
- Next, with a stand or hand-held mixer, beat your sugar and butter for 4-5 minutes, or until light and fluffy. Then, add the eggs, one by one, beating in between each addition. Add the vanilla and beat again.
- In a measuring cup with a pour spout, add your hot chocolate and coffee.
- Finally, alternate adding the dry ingredients and the wet ingredients to your beaten mixture in three additions, starting with the dry ingredients. Mix with a spatula to avoid overworking your batter.
- Pour the batter into your prepared pans and bake for 40-45 minutes, testing with a toothpick for doneness. A few, moist crumbs are okay - just make sure no liquid batter remains on the stick.
- Let the cakes cool for 5 minutes in the pans on a wire rack. Then, use oven mitts to carefully flip the cakes out onto the rack. Cool the cakes fully before attempting to torte and layer your cake. If you're not frosting immediately, you should double wrap each layer of cake in plastic film and freeze them.
Salted Caramel Buttercream
- Beat the butter for 4 minutes, or until fluffy. Then, cup by cup, add the powdered sugar, mixing in between each addition. Finally, add the vanilla and some of the heavy cream to smooth out the frosting, if needed.
- Then, section out a light half of the buttercream in a separate bowl. To this buttercream, slowly add the homemade caramel sauce (made in the section below). Mix and taste test, adding some more vanilla or salt if needed. Keep the plain white buttercream separate for coating and decorating the outside.
- Store buttercream covered, at room temp.
Homemade Caramel
- Next, in a heavy-bottomed saucepan, stir together the sugar and water. Then, turn the heat to medium high and let the sugar caramelize, without touching or stirring it. Watch carefully.
- Once the sugar is amber in color, remove the pan from the heat and add the heavy cream. It will bubble up, so have your whisk nearby, ready to stir.
- Then, put the pan back over low heat and simmer until smooth. Remove once more from the heat and whisk in the butter, vanilla, and salt. Let cool to room temperature. Then, you can store it in the refrigerator until ready to use.
Stacking & Decorating Your Cake
- Once your cakes are cool, use your cake wire to level the tops. Then, apply caramel buttercream and chopped nuts to each layer, before stacking the next.
- Cover the outside of the cake with a thin layer of caramel buttercream, smoothing it out with your cake scraper. Hold the smooth scraper tight against your cake to flatten the frosting and fill in any holes. Then, repeat the process, scraping off extra frosting until a thin, smooth layer remains. Finally, hold your offset spatula flat above the cake, and, starting from the outside, swipe in towards the center to smooth out the top edge. Chill the cake in the refrigerator or freezer for 10-15 minutes to harden the first layer of buttercream.
- Then, apply fresh white buttercream to the outside of the cake, using your cake scraper to smooth it again. Scrape excess frosting off of the scraper to get a really smooth finish. Then, repeat as before with the offset spatula to smooth the top edge of the cake, if necessary. Let the cake chill once more to harden.
- Next, mix a few colors of buttercream on a plate, and use this as your painter's palette. I started off with three shades of blue gray, very light blue, dark gray/green, and a tiny bit of yellow (as you can see in my video.) Scoop some light blue buttercream on your palette knife, and smooth it out onto the top of your cake to make the sky. Use quick, but firm brushstrokes to transfer the paint from the palette knife to the cake. Then, trace the outline of white mountains. Next, use some dark gray to add the shadows and base color of the mountains. You want to add dark, first, and then build lighter color (highlights) on top. After that, add white highlights to - what will become - the sunny-side of the mountains. Next, add a lighter blue-gray as some highlights on the dark (opposite) side to create depth from crags and rocks. Finally, use the dark green/gray to add tiny, blurry lines as trees in the background. Then, make some large trees in the foreground by swiping your palette knife at an outward angle. Then, apply a lighter shade of green to add some highlights to the tree. Use the yellow to add some details on the sunny side of the mountains and on the foreground snow. Then, smooth some purpley-grey in front of the trees as a shadow.Don't worry about being "too neat" with your painting; a distinguishing factor of palette knife painting is the rough, sort of natural look that the color takes on. Think of the image you're painting in terms of colors and lines, not mountains, trees, and snow. Just have fun with it and try your best! Store your cake covered at room temperature for up to three days. Then, move it into the refrigerator for three more, if you have any cake left, that is. 😉Just a note: I like to sketch out my cake designs on my iPad before creating them with buttercream. It helps me get a feel for the colors and lines I'll be creating, and allows me a "rough draft," (or a few) without wasting any cake.

Now You’re A Cake Artist!
And, with that, you are a cake artist! Again, don’t fret if your buttercream painting doesn’t turn out exactly how you envisioned. After all, no matter how it looks, your cake will still taste DELECTABLE!
Speaking of looks, let me get a peek of that cake! Find me on Instagram and tag me in any photos you post of your palette knife painted cake! I love to see what you’re working on!
And, if you enjoyed this post, be sure to enter your email below to receive notification of my next blog post like this one. You don’t want to miss it!
Take care guys! Until next time…
XOXO

P.S.
See my privacy policy for the full Amazon Affiliate disclosure. Profits earned from affiliate commissions help to keep this site running, so that I can continue to bring great content to awesome readers, like you! If you would like, you can still support by clicking through this link and making any other purchases you need. 🙂
P.P.S
Addicted to Pinterest, like me? Pin the image below to save this recipe for later or show it to your friends. After all, sharing is caring. 😉


Pingback:Gelatin Under The Sea Cake — Jello Layer Cake Tutorial
Pingback:Glacier-Inspired Ombre Painted Buttercream Cake & Isomalt Ice Tutorial
Pingback:Mini Dome Cakes - How To Use Cake Leftovers - Easy, Quick Recipe
Pingback:Triple Chocolate Cake With Oreo Crunch, Orange Ganache & Gold Drip