


When the weather turns chilly, there’s nothing more comforting than baking a delicious homemade pie (I’ve been addicted to this apple pie recipe!) Don’t run to the store – there’ll be no premade pastry here. Today, I’m going to share with you how to make the perfect pie crust.

This tried-and-true recipe utilizes the most effective pastry techniques to create a flaky, buttery crust – every time! Plus, each of the tips in this post is backed by science, so you know exactly what makes this pie crust so perfect. That way, you can consistently make an easy, simple pie crust that tastes as if it came from a professional pastry chef.
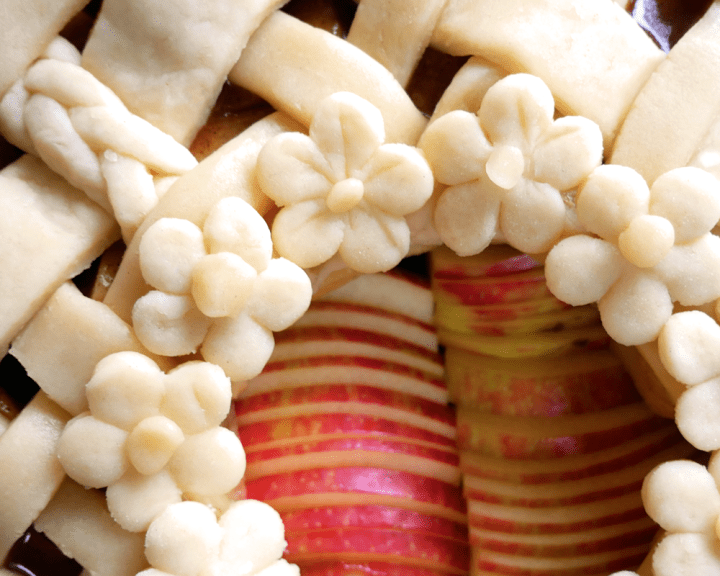
Also, in this post, I’ll provide some of my favorite and most-loved pie crust decorating tips. Level up your pie crust game with beautiful lattice, braids, florals, and more. Perfectly pretty pies because it’s true what “they” say: we really do eat with our eyes first!

So, let’s get started! First, we’ll begin by briefly discussing the scientific role that each ingredient plays in the pie crust. Next, I’ll walk you through the materials list, to make sure you have all the tools you’ll need!
Then, I’ll share with you my decorating tutorial videos, followed by some vital tips and tricks. At the bottom, you can print out or save my most popular pie crust recipe, utilizing all the methods and techniques we learned today!
Happy pie-ing!

Pie Crust Ingredients – An Integral Role To Each
Every ingredient in the pastry dough plays an essential role in the coming together of your pie crust. Understanding the function of each element allows you to make your crust more intuitively, adjusting the steps or addressing common issues where need be.
All-purpose flour, as with many bakes, forms the base, or structure, of our pie crust. By working and handling the flour, you develop the gluten. In some cases, like loaves of bread that require intense kneading, this is good. However, for a delicate, short pastry crust, we want to avoid gluten formation as much as possible.
White sugar sweetens, no surprise there. More than that, though, sugar also holds on to moisture, which hinders gluten formation and creates a super tender crumb. Then, we add salt for flavor, but only a little, since salt can actually increase gluten formation.

To create those super flaky layers, characteristic of any delicious pastry, we use small pieces of cold butter, not melted or creamed. During the baking process, the cold butter releases moisture, which in turn evaporates, and makes small pockets of air in the dough, forming nice, tasty layers. Adding butter to pastry can be tricky, because, if it melts, it won’t create flaky layers. You need to work quickly and avoid resting the pastry near warm sources, even if it’s just a few minutes next to the preheated stove.
For that reason, I like to incorporate a little vegetable shortening in my pie crust recipe as well. Since shortening is stable at room temperature, it remains solid longer into the baking process, allowing you to sneak in some extra flaky layers. Plus, crusts with a little bit of shortening actually hold their shape better than all-butter crusts, which helps keep latticework and other pie crust decorations perfectly neat and clean.
Cold water acts as a binder, bringing the dough together. However, since water aids in gluten formation (which we want to avoid) I use a combination of one part water to one part cold vodka. The alcohol acts as a liquid to help bind the dough when rolling and forming the crust, but during baking, it evaporates. So, you don’t end up tasting or eating any alcohol, but it helps keep the crust tender.
You may not need to use all of the liquid indicated in the recipe; in fact, most of the time, I don’t. To test to see if you have added enough water to your dough, grab a handful and squeeze it together. Then, try to break the piece in half between your fingers. If it crumbles, it’s too dry and needs more liquid. However, if it breaks into two mostly solid pieces, the dough is moist enough. Look for an example of this visual cue in my second video below.
To finalize the pie, just before baking, we brush it with a simple egg wash, mixed with heavy cream. This helps add a golden brown shine and subtle sweetness to the finished crust.
And, that’s it! With just a few pantry staples, you have the makings of a perfect pie crust!

Kitchen Tools You Need To Make The Perfect Pie Crust
The next step in preparing to bake your pie crust is ensuring you have the proper tools. I’ve included links to each item on the list for easy shopping reference. My site is part of the Amazon affiliate program, so we make a commission based on qualifying purchases. I’ve included a link to my full disclosure at the bottom of this post for further information.
- Food processor or a pastry cutter. I prefer to use the food processor to cut the butter into the flour because it’s less messy. However, either tool will suffice.
- Plastic wrap
- Tinfoil or a silicone piecrust shield. Both options have pros and cons. The foil can be tricky to form perfectly around a piping-hot pie but can take on any shape you need. The pie crust-shield costs a bit more upfront but perfectly protects your crust – and only the crust, not the top of the pie. However, it is washable and reusable!
- 8- to 10-inch aluminized steel pie plate. You could use glass if that’s what you have, but keep in mind that pie baked in a glass pie plate may finish baking up to 10 minutes earlier than metal. Watch the pie carefully!
- Pastry brush
- Pastry wheel/cutter
- Cookie cutters, fondant stamps, etc. (You can create any design you prefer. I buy mine locally, but this set contains the same flowers I used)
- Parchment paper
- Rolling pin

How To Make The Perfect Pie Crust Decorations
Once your pie crust is prepared (recipe below) it’s time to fill your pie pan and create the decorations!
Tutorial Videos
Check out these quick tutorial videos to see how I create my pie crust decorations. In the first one, I demonstrate an artsy, “hole-in-the-middle” design, and show you how to braid lattice pieces together.
Here is the decorating method I used to create the pie in one of my most popular posts on IG! In this video, watch for the visual cue to see if your pie crust dough is moist enough.
Pie Crust Decorating Tips
I like to roll out my pie crust in between two sheets of parchment paper. Some people add a little flour to reduce sticking, but I find this can dry out the dough too much. Parchment paper makes the dough easier to handle, move, and unstick. With that said, feel free to keep the flour handy if the dough is too sticky, even for the parchment paper.
Before and after handling your pie crust (or anytime it gets too soft), pop it into the refrigerator on a baking sheet for 10 minutes to firm up a bit. Remember, you don’t want to reroll and knead your dough too many times, otherwise, it will become tough.
When cutting lines for lattice, use a straightedge of some sort to make sure they are parallel and straight. Chill the lines slightly before creating lattice to ensure they keep their shape. Then, build the lattice on a piece of parchment paper, first. Press the pie crust pieces to each other until they stick, and chill well in the refrigerator. This allows you to peel the lattice away from the parchment and lay it over the pie without pieces sliding or moving around too much – the key to a perfectly even and smooth lattice.
I also like to pre-cook my fruit fillings (like in this apple pie recipe) so they don’t reduce, lose shape, or make your crust sag.
Beware of layering too many decorations on top of each other, as the pie crust pieces closer to the top of the oven may start to cook and burn faster than the rest. As a rule of thumb, I like to stick to three layers or less. For example, I laid a center of a flower over top of the flower, which was over the top of the lattice. Any more and you risk the crust burning too quickly.
Also, make sure that you don’t let the egg wash pool in the corners or crevices of the pie crust, otherwise, it will burn.
How To Make The Perfect Pie Crust – Recipe
Feel free to print out this pie crust recipe, or save it on Pinterest with one of the “pinnable” images below. Enjoy!
Easy, Ultra-Flaky, Super Buttery Pie Crust
Ingredients
- 2½ cups all-purpose flour, sifted
- ¼ cup white sugar
- 2 tsp salt
- ¾ cup cold butter, cubed (1½ sticks)
- ¼ cup cold vegetable shortening
- ⅛ cup cold vodka (you may not need it all)
- ⅛ cup cold water (you may not need it all)
- 1 tbsp heavy cream
- 1 egg
Instructions
- Mix your vodka and water together and place it in the freezer, along with your cubed butter and shortening. It doesn't need to (and shouldn't) freeze, but while prepping our next ingredients, we want to keep it really cold. Place all of your dry ingredients into the bowl of your food processor.
- To the food processor, add in your cold butter and shortening. Pulse the food processor until the mixture resembles pea-sized lumps. If you're using a pastry cutter, smash the butter into the flour with the spokes until you break up some of the chunks and achieve a similar texture as above.
- Next, drizzle in just enough of the water/vodka mixture, while pulsing the food processor, until the dough begins to hold together. Remember, we want this liquid ice cold so as not to melt any of the butter.TIP: I like to add about half of the liquid, and then test it: scoop a handful of the pastry dough out and squeeze it together. Then, use your thumb or finger to break that lump apart in the center. If it immediately crumbles, you need to add more liquid. Once a lump in your hand splits into two pieces, you're dough is thoroughly moistened. You may not need to use all of your liquid now. If not, leave it in the fridge for later.
- Turn your dough out onto some plastic wrap and knead it together a few times into two, round discs. Wrap each one separately and chill in the refrigerator for about an hour.
- Once your dough is thoroughly chilled, bring it out to your counter, along with any leftover liquid (or a new glass of cold water.) Let the pastry dough sit on the counter for 3-5 minutes before starting to roll it out. Then, flatten one of the discs to create your bottom pie crust (if needed) and use the other for lattice and decorations.
- Use this pie crust as a base for your favorite pie recipes.
Notes
The Best Pie Crust For The Best Pies
Keep up with my latest bakes by connecting with me on Instagram so we can keep in touch! I love to share behind-the-scenes photos of blog content and sneak peeks of new recipes!

And, if you liked this post, feel free to enter your email below to receive notification of my next blog post. You don’t want to miss it!
Bye for now!
XOXO

P.S.
See my privacy policy for the full Amazon Affiliate disclosure. Profits earned from affiliate commissions help to keep this site running, so that I can continue to bring great content to awesome readers, like you! If you would like, you can still support by clicking through this link and making any other purchases you need. 🙂
P.P.S
Addicted to Pinterest, like me? Pin the image below to save this recipe for later or show it to your friends. After all, sharing is caring. 😉


Pingback:Fig and Goat Cheese Danishes — Recipe, Tutorial, and Pastry Tips
Pingback:Chai Spiced Pumpkin Hand Pies – Lexis Rose
Pingback:Lemon Lavender Meringue Tart with Thyme Shortcrust Pastry
Pingback:2-Tier Great Gatsby Roaring '20s Cake - Decorating Tutorial
Pingback:Strawberry Custard Pie with Easy Homemade Basil Pie Crust for Pi Day