


No matter the season, there is nothing quite like a plump, sweet chocolate-covered strawberry. Of course, in my never-ending quest to add some creativity to classic favorites, I just HAD to transform this simple treat. So, today, I’m going to share with you how to create this eye-catching, gravity-defying chocolate-covered strawberries cake!
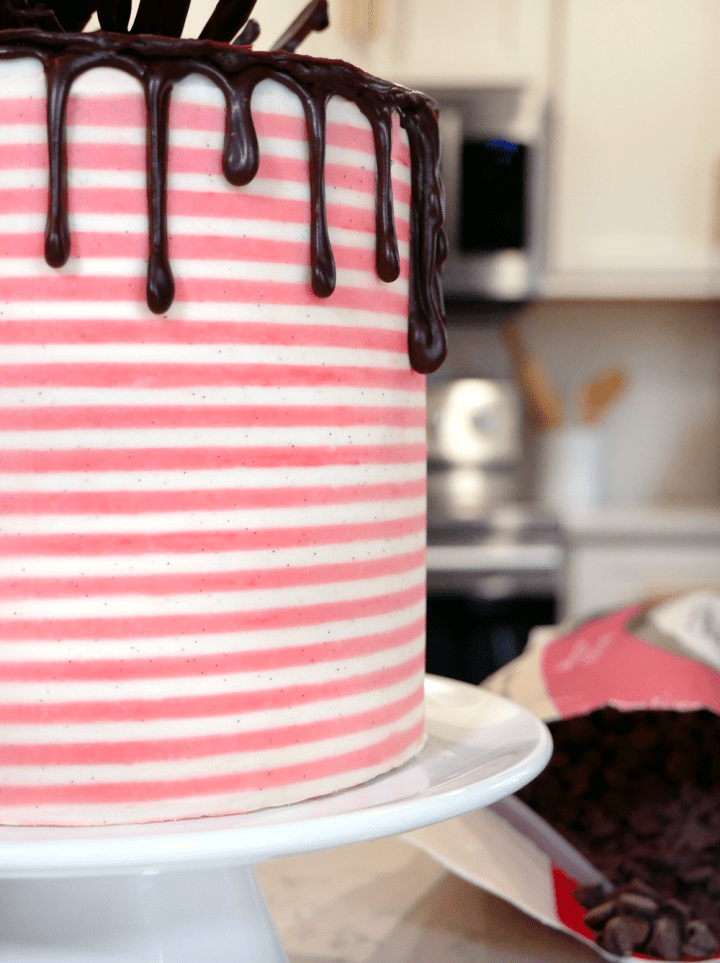
This rich chocolate delight, layered with a flavorful homemade strawberry jam, is everything that cravings are made of. The light vanilla buttercream has just enough sweetness to tempt your palate, with a few drops of my secret ingredient – cherry bitters – to really elevate the red-berry flavor. Oh, and don’t forget the luscious, creamy chocolate ganache drip, adorning the top and sides. Just go ahead and label this one as your new favorite cake.

Then, in this tutorial, I’ll show you how to decorate your chocolate-covered strawberries cake with a stunning, gravity-defying illusion! By craftily utilizing some fondant, foil, balloons, and a cake-pop stick, you’ll make a cake topper strawberry that actually looks like it was just dipped in some chocolate – splash and everything!
And, the cake wouldn’t be complete without some charming, candy-store-esque buttercream stripes. I’ll show you how to easily accomplish this striking technique.
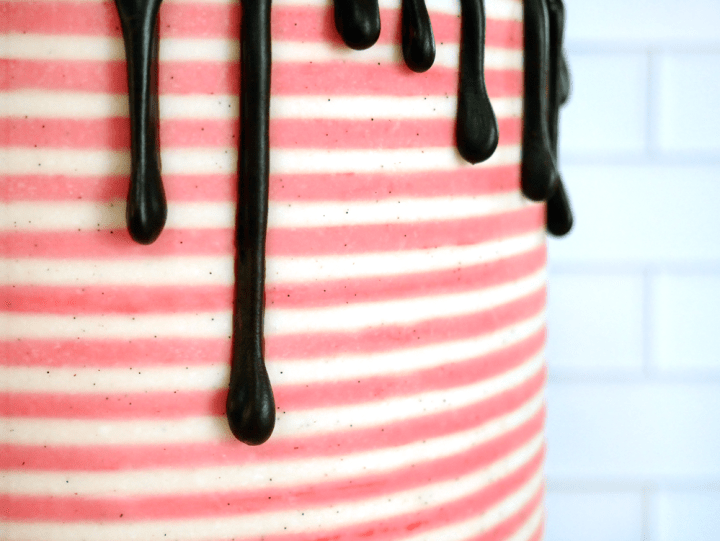
Just look at those beautiful stripes, chock full of vanilla bean flakes! And, that rich, creamy chocolate ganache. Okay – now I’m drooling, are you?
Well, without further ado: on your marks, get set, BAKE!

Gravity-Defying Chocolate-Covered Strawberries Cake Tutorial
Check out this quick, helpful tutorial video for a visual walk-through of decorating your chocolate-covered strawberries cake!
Baking Materials List
Double-checking you have all of the necessary materials before you get started is the first step to a successful bake!
For this chocolate-covered strawberries cake (and the beautiful decor elements), you’ll need the following items. I’ve included links to everything, in case you need to stock up on a few things. I am an Amazon affiliate, which means my site makes a commission on applicable sales, at no additional charge to you. For more info, see my full disclosure below.
- 3, 8-inch cake pans
- Whisk
- Stand or hand-held mixer
- Spatula
- Mixing bowl
- Large liquid measuring cup (with a pour spout)
- Cooling racks
- Medium-sized saucepan
- Plastic wrap
- Chef’s knife & paring knife
- Piping bag
- Microwave-safe bowl
- Candy thermometer
- 2-3 Balloons (yes, like, the latex party kind)
- Cake leveler, turntable, offset spatula (buying all in a kit like this one is usually more cost-effective)
- Smooth bench/cake scraper and a textured/striped cake comb (my “grooves” measure less than 1/4″ wide, but I purchased it locally. This one is similar. The narrower the “grooves,” the smaller the stripes.)
- Fondant
- Rolling pin
- Food coloring gels
- Cake-pop sticks
- Food-safe paintbrush
- Clear, food-grade alcohol, like vodka
- Tinfoil
- Ball-tipped fondant tool (or, I used the back end of my food-safe paintbrush)

Chocolate-Covered Strawberries Cake Recipe
Now, it’s time for the fun part! Peruse the ingredients list and recipe below to get started baking! Feel free to print out this recipe, or save it on Pinterest using one of the “pinnable” images below!

Chocolate-Covered Strawberries Cake with Striped Buttercream
Ingredients
Chocolate Cake
- 2¼ cups all-purpose flour, plus more for prep
- 3 tsp baking powder
- ¾ tsp baking soda
- ¾ tsp salt
- 1¼ cups cocoa powder
- ¾ cups room temp butter (1½ sticks), plus more (cold) for prep
- 3 cups white sugar
- 2 cups milk
- 1 cup brewed coffee, weak/watered-down
- 3 large eggs
- 3 tsp vanilla extract
Strawberry Jam Filling
- 1 cup water
- 4 tbsp cornstarch
- 1 lb fresh strawberries
- 4 tbsp maraschino juice (the syrup from a jar of maraschino cherries)
- 1 tbsp lemon juice
- ¾ cup white sugar
Light Vanilla Buttercream
- 2 cups (4 sticks) room temp butter
- 7½ cups powdered sugar
- 2 tsp vanilla extract
- 2 tsp vanilla bean paste
- 4 tbsp room temp heavy cream (you may not need it all)
- 10-15 drops cherry bitters
Chocolate Ganache Drip
- 1 cup semi-sweet chocolate chips
- 1 cup heavy cream
Chocolate "Splash"
- 1 package chocolate melting wafers/candy melts (see notes below*)
Instructions
Chocolate Cake
- Preheat your oven to 325°F. Then, thoroughly butter and flour your cake pans.
- In a mixing bowl, whisk together the flour, baking powder and soda, salt, and cocoa powder. Set aside.
- Cream together your room temperature butter and sugar on a medium speed for 4-5 minutes, until it's light and fluffy. Then, with the mixer running, add your eggs one at a time, and finish with the vanilla.
- Add your watered-down one cup of coffee to the milk in a measuring cup with a pour spout. Let it cool slightly, if still hot.
- In three different additions, alternate stirring in the liquid and the dry ingredients to the egg/butter mixture, starting with the flour. Mix gently after each "round" of liquid and dry are added.
- Pour the batter evenly into the three prepared pans and bake for 35-40 minutes, testing with a toothpick for doneness.
- Let the cakes cool in their pans for up to five minutes, but no longer. Carefully turn them out onto a wire cooling rack to finish cooling. Once the cakes have fully come to room temperature, wrap each individual layer in plastic wrap and freeze until you're ready to assemble your cake.
Strawberry Jam Filling
- Whisk together the water and cornstarch in a medium-sized saucepan.
- Chop your strawberries into small pieces and add them to the pan, along with the maraschino syrup, and white sugar. Bring this mixture to a boil, and let cook for 2 minutes.
- Lower the heat and let the mixture simmer for 15-20, or until it is thick enough to coat the back of a spoon. Once it has thickened, add the lemon juice and stir.
- Pour the jam into a shallow container and let it cool to room temperature first, and then put it in the refrigerator for at least 30 minutes, or up to one week. You can use the jam straight from the refrigerator when adding it to your cake layers.
Light Vanilla Buttercream
- Cream the butter until it is light and fluffy. Then, cup by cup, begin to add the powdered sugar, scraping down the bowl in between each addition.
- Next, add in your vanillas and bitters, and mix to combine.
- If your buttercream is super thick, you can add up to 4 tbsp of heavy cream to loosen and smooth it out. Be careful not to add too much, or else your buttercream won't be stable enough to support the cake layers. I usually only add 1 tbsp, but, ultimately, it will come down to how you measured your powdered sugar.
- You can store the buttercream in the refrigerator for a few days if need be. Just bring it to room temperature before attempting to assemble your cake.
Decorating & Assembling The Chocolate-Covered Strawberry Striped Buttercream Cake
- Level the tops of your cakes to create a flat decorating surface.
- Pipe a "dam" of buttercream around the edge of your cake layer, and fill it with your strawberry jam. Place the next cake layer carefully on top, and repeat. Invert the last cake layer so that the smooth, bottom edge of the layer is now the top of your cake.
- Use your offset spatula to apply buttercream to the cake. Then, with your flat bench scraper, smooth the outside of the buttercream. Fill in any gaps and smooth again.
- Let the cake chill in the freezer for 10-15 minutes. Then, add more buttercream to all the sides of the cake. This time, use your textured cake scraper, in the same manner, to create smooth grooves around the cake. Chill again.
- With a different color of buttercream, fill in the grooves of your cake. Then, with the flat-edged cake comb, begin to scrape down the sides once more. Smooth out the cake, removing buttercream until you have clean, solid strips.
Chocolate Ganache Drip
- On the stove, or in a microwave-safe cup or bowl, heat your heavy cream until it starts to bubble or scald. Don't let it boil, but it should be close.
- Place your chocolate chips into a heat-proof bowl, and pour the heavy cream over top. Let this sit untouched for thirty seconds.
- Slowly, start at the center, stirring in little circles. As the chocolate begins to melt, stir using larger circles until the ganache comes together.
- Let the ganache cool to thicken. Place it in a piping bag and test a few drips down the side of a chilled cup or bowl. If the drips are too thin or fast, let the ganache cool more. However, if the ganache barely moves down the edge, try heating it up slightly. Once the consistency is right, pipe the ganache over the edges of your cake, letting it drip down the sides. Then, fill in the top with the remaining ganache. Use an offset spatula to smooth out the top, spinning the cake around to create smooth rings that resemble ripples.
Chocolate "Splash"
- Melt your candy wafers according to the directions on the package, or temper dark chocolate.
- Inflate 3 balloons until they approximately resemble the size of a softball or grapefruit. I like to inflate 3, just in case one breaks, or you don't like the size of another. Carefully set the balloons in a glass cup, tied part facing down. Mist the balloons with some non-stick cooking spray.
- Pipe or pour your chocolate over the top of the balloon, slowly at first, adding more until you are happy with the shape. Let this chocolate set until it's fully hardened.
- Gently press in on the balloon near the hardened chocolate in order to loosen the more fragile "splashes." Then, carefully, and as slowly as possible, use a pin or knife to pop the balloon. Carefully peel the rubber away from your chocolate. Invert the "splash" and press it into the center of your cake. If any of the smaller "arms" of chocolate break off, you can heat up a non-stick pan and gently melt the bottom of the chocolate, and re-adhere it in place.
Fondant Strawberry
- Create a strawberry-shaped mold out of tinfoil. Insert a cake pop stick into the center. Then, cover the foil with plastic wrap to soften the edges.
- Knead and color your fondant until you're happy with the red color. Roll it out to a thin, but manageable, sheet, and drape it over your mold. Gently use your fingers to smooth out the wrinkles and pull off any excess fondant.
- Use a round-tipped fondant tool to create the indentations for your strawberry "seeds." Make small, little, yellow balls and press them gently into the indentations.
- Then, use a pairing knife to cut out some green fondant leaves. Let them dry in a ring of tin foil to give the leaves a natural, wavy shape.
- With a food-safe paintbrush, wet a sheet of brown fondant slightly with vodka. Apply it to the strawberry, and, again, smooth out and wrinkles. Add another small piece at the base to mask the cake pop stick.
Notes

Enjoy & Happy Cake-ing!
I hope you LOVE your gravity-defying striped chocolate-covered strawberries cake! I have confidence this will be your new favorite recipe!
I love to see what you’re working on in the kitchen, too! Tag me in your next bake so I can give it some love! Feel free to find me on Instagram so we can keep in touch!
If you’re in the mood for another fun illusion cake, check out my Stack of Pancakes Cake, here! Spoiler alert – this isn’t actually a stack of pancakes.

Oh, by the way, if you liked this recipe, enter your email below to receive notification of my next blog post. I don’t send spam, just a quick, helpful reminder when I publish a new post you might like.

Bye, for now!
XOXO

P.S.
See my privacy policy for the full Amazon Affiliate disclosure. Profits earned from affiliate commissions help to keep this site running, so that I can continue to bring great content to awesome readers, like you! If you would like, you can still support by clicking through this link and making any other purchases you need. 🙂
P.P.S
Addicted to Pinterest, like me? Pin the images below to save this recipe for later or show it to your friends. After all, sharing is caring. 😉


Pingback:Mini Dome Cakes - How To Use Cake Leftovers - Easy, Quick Recipe
Pingback:Penguins On Vacation - Triple Chocolate Oreo Crunch Cake
Pingback:Triple Chocolate Cake With Orange Ganache & Gold Drip
Pingback:Wintery Square Cake with Buttercream Flowers & Striped Texture
Pingback:Penguin Skating Rink Peppermint Hot Chocolate Cake
Pingback:Chocolate Brandy Snow Globe Cupcakes & Eggnog German Buttercream